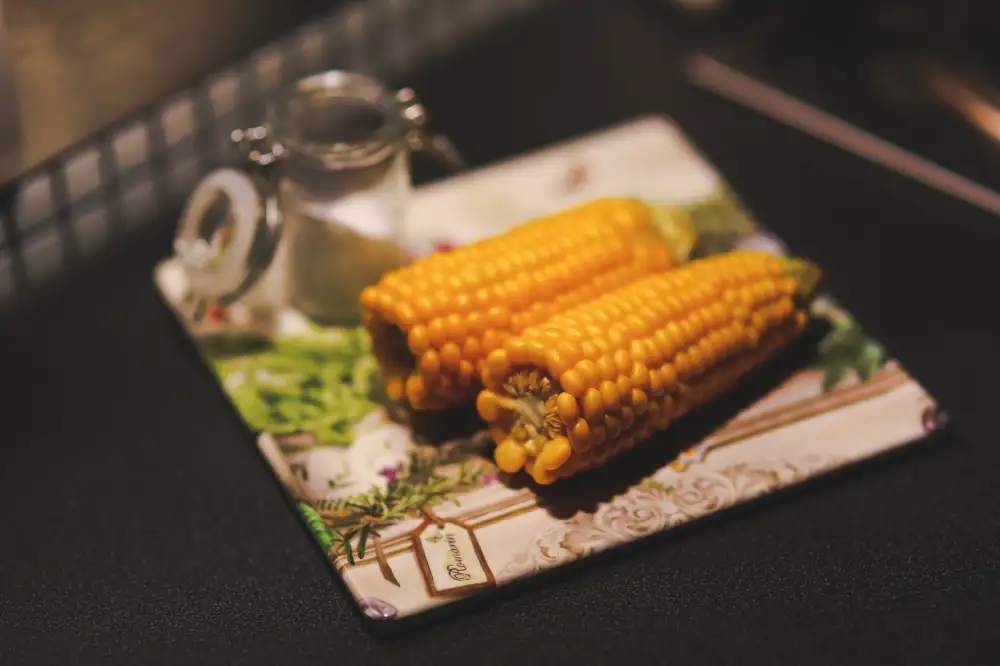
Perfectly Boiled Corn on the Cob: Step-by-Step Instructions for Cooking the Juiciest Ears of Corn
Boiling corn on the cob is a classic and simple way to enjoy this summer staple. Whether you're hosting a backyard barbecue or craving a delicious side dish, perfectly boiled corn on the cob is sure to satisfy your taste buds. In this step-by-step guide, we will walk you through the process of cooking the juiciest ears of corn that will leave you wanting more. So grab your apron and let's get started!
Step 1: Choose Fresh Corn
When it comes to boiling corn on the cob, selecting fresh and high-quality corn is crucial. Look for ears of corn that have bright green husks and moist, silky tassels. Avoid any corn with dry or brown husks, as this indicates that the corn may be past its prime.
To ensure the best flavor and texture, try to buy corn from local farmers' markets or roadside stands where you can find freshly harvested corn. If that's not possible, choose corn from your grocery store that has been recently delivered.
Remember, the sweetness and juiciness of your boiled corn will greatly depend on the freshness of the ears you choose. So take a few extra minutes to carefully inspect each ear before making your selection.
Step 2: Prepare the Corn
Before boiling the corn, it is important to prepare it properly. Start by removing the husks and silks from each ear of corn. Gently peel back the husks, taking care not to tear them, and remove any remaining silks. Rinse the corn under cold water to remove any dirt or debris.
If desired, you can also tie back the husks with kitchen twine to create a decorative presentation. This step is optional but adds a nice touch if you're serving the corn on the cob as part of a special meal or gathering.
Once the corn is cleaned and prepared, you are ready to move on to the next step: boiling.
Step 3: Boil the Corn
Once you have prepared the corn by removing the husks and silks, it's time to boil them to perfection. Fill a large pot with enough water to fully submerge the corn. Make sure not to overcrowd the pot, as each ear of corn needs space to cook evenly.
Place the pot on the stovetop over high heat and bring the water to a rolling boil. Once it reaches boiling point, carefully add the prepared corn into the pot. Gently push down on them with a spoon or tongs to ensure they are fully submerged in the water.
Cover the pot with a lid and reduce the heat to medium-high. Allow the corn to simmer for about 8-10 minutes. This cooking time may vary depending on how tender or crisp you prefer your corn.
Avoid overcooking as it can result in mushy corn kernels. Keep an eye on them and adjust the cooking time accordingly. Remember, we want juicy ears of corn that still have a slight crunch when bitten into.
While boiling, you may notice some foam forming on top of the water. Don't worry; this is normal and can be skimmed off if desired.
Boiling is one of the simplest methods for cooking corn on the cob, as it allows for even heat distribution and retains its natural flavors. It also ensures that every kernel is cooked through without drying out.
Now that we've boiled our corn to perfection, let's move on to step 4: determining the cooking time for your preferred level of tenderness.
Step 4: Determine the Cooking Time
The cooking time for corn on the cob can vary depending on its size and freshness. As a general rule, medium-sized ears of corn usually take about 8-10 minutes to cook. Larger ears may require a few extra minutes, while smaller ones may be ready in just 6-8 minutes.
To determine the cooking time more accurately, you can insert a fork or knife into one of the kernels. If it easily pierces through and the corn feels tender, it is likely cooked to perfection. However, if there is resistance or the kernel feels hard, it needs more time to boil.
Remember that overcooking can result in mushy corn, so it's essential to keep an eye on the pot and not exceed the recommended cooking time. By following this step carefully, you'll ensure that your corn on the cob is cooked just right – juicy and full of flavor!
Step 5: Check for Doneness
To ensure that your corn on the cob is perfectly cooked, it's important to check for doneness. Gently insert a fork or a knife into one of the kernels. If it easily pierces through and the kernel is tender, then your corn is ready. Be careful not to overcook it, as this can result in mushy corn.
Another way to check for doneness is to press a kernel with your finger. If it releases milky juice, then it's cooked and ready to be enjoyed. However, if the juice is clear or watery, you may need to cook it for a few more minutes.
Remember that cooking time can vary depending on the freshness and size of the corn, so it's always best to test a few kernels before removing all the ears from the pot. Once you're satisfied with the doneness, proceed to the next step of removing and serving the corn.
By following these simple steps and checking for doneness, you'll be able to enjoy juicy and flavorful corn on the cob every time. So go ahead and savor this classic summer treat with butter, salt, or any other delicious toppings of your choice!
Step 6: Remove and Serve the Corn
Once the corn is cooked to perfection, it's time to remove it from the boiling water and get ready to enjoy its juicy goodness. Using a pair of tongs or a slotted spoon, carefully lift each ear of corn out of the pot, allowing any excess water to drain off. Place the boiled corn on a serving platter or individual plates.
To enhance the flavor, you can brush melted butter onto the hot corn while it's still steaming. This will add a rich and creamy taste that complements the natural sweetness of the corn. You can also sprinkle some salt and pepper for an extra kick of flavor.
Serve your perfectly boiled corn on the cob as a side dish alongside grilled meats, salads, or other summer favorites. It's also great on its own as a light snack. Don't forget to provide some napkins because eating corn on the cob can be messy but oh so satisfying!
Remember, freshly boiled corn is at its best when served immediately. The longer it sits out, the more it loses its heat and freshness. So gather your loved ones around, dig in, and savor every juicy bite of this summer delight.
With these step-by-step instructions, you'll have no trouble achieving perfectly boiled corn on the cob every time. Follow these tips and techniques to bring out the natural sweetness and juiciness of this beloved vegetable. Enjoy!
Now that you have mastered the art of boiling corn on the cob, it's time to enjoy the fruits of your labor. Take a moment to appreciate the vibrant yellow kernels and the enticing aroma wafting through your kitchen. Whether you choose to serve it with a pat of butter, a sprinkle of salt, or a drizzle of lime juice, each bite will be bursting with sweetness and juiciness.
Remember, the key to perfectly boiled corn lies in selecting fresh ears, preparing them properly, and cooking them for just the right amount of time. By following these simple steps, you can ensure that every ear of corn you boil will be tender and full of flavor.
So gather your friends and family around the table, share stories and laughter as you savor this summer staple. Let the joyous crunch of each bite transport you to sunny days spent at picnics and barbecues. Celebrate food and all its delicious possibilities by indulging in a plateful of perfectly boiled corn on the cob.
Join our culinary community at "Taste the Love" magazine as we continue to explore new recipes, techniques, and ways to celebrate food together. Happy cooking!
Published: 25. 11. 2023
Category: Food